Tuesday, July 21, 2009

Vege Quiche

I have to say, the one thing I really should have considered when I decided that I was going to blog some recipes was that I'd have to measure. Me? Measure? So many times I've taken pictures of things I've cooked and gotten all excited about posting the pictures and recipes of this yummy food and then realised I have no idea exactly what quantities of ingredients I put in it. How am I supposed to post a recipe? It's not like I can get on here and type 'well just throw in a dash of A and about so much of B. So this morning when I decided to make this quiche I made sure to pay attention to what I put into it. And TA DA, we have a recipe.


It's not really a traditional quiche, more like a mutation of a quiche since it doesn't have any crust to speak of and I cook it in a lasagna dish, but it's the way I do it and it's yum!

Ingredients:

  • 3 Zucchini's grated
  • 2 carrots grated
  • 1 onion finely chopped
  • 1 small red capsicum diced
  • 2 tomatoes diced
  • 1 cup of grated cheese (any kind of tasty hard cheese)
  • 1 cup of self raising flour
  • 1/3 cup of olive oil
  • salt and pepper to taste
  • 3 egg whites
  • 4 eggs

Now I forgot about the cheese and the onion when I took the picture but as long as you don't forget to put them in the quiche you'll be OK. I like to add some corn kernels as well but I didn't have any.

Something else to note it, the reason I used egg whites is because I had left over from a salad dressing I made. Normally I would just used 6 whole eggs.

OK, I think that's it. Moving on..........

Method:

  1. Mix the veges and cheese together in a large bowl
  2. Next, add the flour and salt and pepper and stir it through making sure to coat everything in the flour
  3. Mix the olive oil through
  4. And now the eggs
  5. Mix it all up with a wooden spoon making sure all the ingredients are well combined
  6. Line a lasagna dish with baking paper and pour the mixture in. (Baking paper is my saviour. It's so much easier to line everything with baking paper than to grease the dish only to have something stick anyway. Plus, it makes washing up alot easier.)
  7. Bake at 180 degrees C for approx 45 Min's

It's that easy and great for lunch boxes.

Enjoy!

Love Kylie

Sunday, July 19, 2009

A Small Confession

Sssshhhh, don't tell anyone but I actually enjoy mowing the lawn. Does that make me crazy? I have friends who've never even started a lawn mower and they sure think I'm mad but there's just something therapeutic (and maybe a little obsessive compulsive) about seeing those nice neat lines on the lawn when I'm done.

Do you know what the best thing about it is?
The kids can't run out into the yard and make the grass grow by running on it. So I'll take cutting the grass over cleaning the house any day.

Tuesday, July 14, 2009

A Bit from the Bush

Like I mentioned in my previous post, every winter holidays while the older kids go to their Mum's, Dan and I toddle off to spend a couple of weeks at our bush getaway. It's in one of the wettest places in the country so normally it's freezing, raining and dismal but this year we were blessed with fantastic weather. Sunshine every day and we even managed to wear shorts without freezing our butts off!


Since we only get there once a year it's always terribly overgrown and we spend almost the whole time we're there on the brush cutter slashing back the guinea grass while getting eaten alive by mossies and having our legs carved up by those horrible, prickly, feral wild raspberry bushes. The fruit is lovely but if you've ever had the pleasure of dealing with the bush you'll know what I mean.
But...........
This year we had this!
Oh yeah baby!! *sings 'She thinks my tractor's sexy.......'* (I don't really but I get that stupid song stuck in my head every time I see one. Needless to say I was singing it alot these holidays.)
This dinky little tractor with a slasher on the back saved us hours and hours of backbreaking brush cutting and Dan cleared the whole area in a couple of days. The best investment we ever made!
So with the work out of the way we had time to play. We took Harrison to the Malanda show. He loved seeing all the animals.

He especially loved the cows.How could you not? Check out these beautiful bovine creatures.

Dan's family have a beach house at Russell Heads so we spent a day there too. Geez it was hard going. What an horrible place hey?
Other than that, we did alot of relaxing. I took at couple of trips to the nearest town to shop up a storm. I replenished my scrapbooking supplies because I needed to. And bought some new clothes of course.

By then end of the trip as usual I was eager to get home. Can you believe I was actually bored? A rare and unusual phenomenon. But damn it felt good.

Here are a few more pics. Enjoy!

One foggy morning.....The only picture of me from the whole trip and I had to take it myself.Our humble hideawayHarrison pretending to drive the tractor
A tea plantation on the tablelands
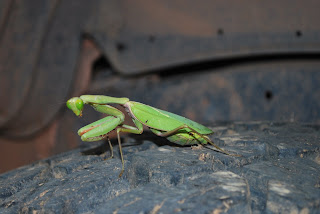
Those pesky wild raspberries. Harrison ate hundreds!Look who I found lurking on our car tyre on day
This poor butterfly must have been at deaths door to be so obliging to a curious little boy and an amateur photographer
The Langoleers are coming! And that's all I have to say about that.

Love Kylie

Monday, July 13, 2009

And You Thought I'd Abandoned You

I'm Back!! Long story short, I've had no internet access for the past couple of weeks. We've been on a break in the bush. I meant to make a post before we went away but technology failed me and I didn't get the chance.
I hope you can forgive me. I'll try not to let it happen again.
I'll be back tomorrow with more.

Monday, June 22, 2009

It's All About Me

What is this, blogging day 4? And I realise I really haven't shared anything about myself. So lets get that over and done with. Long story short:

I live in a very small town. I am a lucky enough to be a stay at home Mum of 4 children. My three step-kids who are 14,12 and almost 10 and my almost two year old Harrison who keeps me on my toes. My partner Dan works too hard but it allows me to do what I do and I appreciate it every day.

I moved here from the city for a six month break from the hustle and bustle. That was 6 1/2 years ago and I don't think I'll be going anywhere in the near future.

I love my family and couldn't live without them and my friends. I love to keep busy but that's not hard. You already know what I do in my spare time.

That's pretty much me in a nutshell. I won't bore you with the finer details. Now we can concentrate on the important things.

Love Kylie

Sunday, June 21, 2009

The Yummiest Crumbed Steak EVER

I have to credit my fabulous mother-in-law for this one. Yes you did read correctly. I did just call my mother-in-law fabulous. And that's because she is! I know it's a rare thing to get along with your mother-in-law but I do, and I'm so glad. It makes life much easier. Of course it also helps that we live approx. 1000km away from each other but I like to think it would be the same if she lived right next door.

I made this for dinner tonight and everyone devoured it. The main reason home made crumbed steak is so much better than the pre-prepared stuff is the meat you use. Alot of butchers like to hide cheap cuts of meat under those crumbs and there's nothing worse than taking a bite of steak to find nothing but sinew and fat. Blech!
On with the recipe..........
First, ask your friendly butcher to slice you some rib eye fillet nice and thin. You want to be able to cook it nice and quick so you don't burn the crumbs. Unless of course you like rare steak, then you can go ahead and use the thick stuff.
The Coating: This quantity will coat enough meat to feed my family of six with leftovers so if you're only cooking for two you'll need to reduce the quantities unless you want to eat steak all week.
  • I can of evaporated milk
  • 2 eggs
  • about 1 cup of all purpose flour
  • approx. 2 cups bread crumbs (packaged not fresh)
  • 2 tspns garlic salt
  • 1 tspn dried oregano
  • cracked pepper
  1. Start by pouring the can of evaporated milk into a mixing bowl and whisking in the two eggs.
  2. Dump your flour into a separate bowl
  3. In a third bowl mix together the bread crumbs, garlic salt, oregano and a few good grinds of pepper

Now set up your production line. Starting with the flour, then egg mixture, then the crumb mixture. Have a plate ready at the end with some paper towel ready for your freshly crumbed steak.

Start by coating your steak lightly in the flour. It helps the egg mixture stick better. I can't explain why but it does. Trust me.

Next coat it liberally in the egg and milk mixture.

Then of course coat it in the crumb mixture and put it on the waiting plate.

Repeat with the remaining steaks. It should look something like this.


I always find it's best to refrigerate it for at least a couple of hours before cooking. It helps the crumbs set and hopefully they won't fall off during cooking.

When it's time to cook, heat your pan to just over medium heat. Anything too hot will burn the crumbs before the steak is cooked and we don't want that.

Melt a good amount of butter in the pan. Now you could use any other kind of oil but lets face it, butter tastes better!

Once the pan is heated, pop your steaks in there and cook them until the crumb mixture is nice and golden, then turn them over and do the same to the other side. It's as simple as that!Don't do what I did and take leave to write the kids permission notes for school while it's cooking or it might end up a little past golden like this.
But it was still yummy!

I served it with whipped potatoes peas and corn on the cob. Simple, hearty and delicious. I hope you like it.

Love Kylie

Friday, June 19, 2009

Scrapbooking and Sugary Treats

Last night was good. I really feel like I've achieved something. I finally completed my baby's 1st year album!!!! I've been piecing together his 1st birthday party page for what feels like forever and now it's done. Sure maybe I mixed and matched some embellishments that should probably never be seen together and sure there are a few things that are slightly skewiff (is that even a real word?) but it's done. D.O.N.E and I'm so happy!

Will I be posting pictures of this final page achievement? Ummm, the answer to that would be a firm no. No-body need to see that. I do have a couple of pics to show you though.

The title of this page is 'Come On Mummy'. Early one morning my sister MRD( I'll explain another time) and I were out on an early morning photography adventure and of course Harrison (my almost two year old) was tagging along. It didn't take long before he got sick of watching us taking photos and he kept grabbing me by the hand trying to drag me away and saying, 'Come on Mummy, come ON'. So I turned and snapped a one handed photo of him trying to pull me over to where ever it was that he wanted to be. Here is the result.

Before......... Papers chosen but still no real idea of what I'm going to do with it
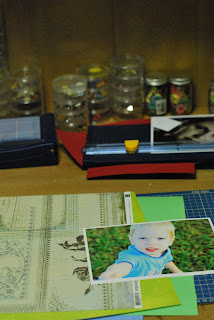
And............TaDa! The finished product. Nothing too fancy. Nice clean lines. I'm happy with it. And I just LOVE The photo. The photo on the page I mean. Not the photo of the page.
What do you think? Don't hold back. I can take it.

Now as promised.....the cupcake recipe. They are so delicious. So moist and sweet. So PINK! I love hot pink icing. There's just something about it. Of course you can make yours any colour you like but seriously, after seeing the hotness of the pink, how could you resist?


Enough babble and on with the recipe. I found this recipe on a website a long time ago when I was looking for a different Vanilla Cake recipe to make a birthday cake for a friend. I would love to credit the site but alas, I copied it by hand and have no idea where it came from now. If anyone does feel free to let me know. What was that I said about not babbling any more?


OK the recipe - Vanilla Cake


  • 2 cups of sugar

  • 4 eggs

  • 2 1/2 cups of all purpose/plain flour

  • 1 cup of milk

  • 3/4 cup vegetable oil ( I didn't say there was anything healthy about it did I?)

  • 2 1/4 teaspoons of baking powder

  • 1 teaspoon of vanilla


  1. Preheat your oven to 180 degrees C (350F). Line your muffin tins with muffin papers or if you're making the cake version line two 9x13 inch rectangular baking pans

  2. In a large mixing bowl, with an electric mixer, beat sugar and eggs together until they're slightly thickened (about 1 minute). Add flour, milk, oil, baking powder and vanilla. Beat for another minute, just until the mixture is smooth and creamy. Don't overbeat. Pour batter into prepared pans.

  3. Bake in the preheated oven for 30-40mins (for the cake version) approx 20mins (for the cupcake version) or until the tops are golden brown and skewer poked into the centre comes out clean. Let cool completely before covering with frosting.

And that's it, How easy is that? And so delicious.


Now as for the frosting, I just used a simple icing/powdered sugar, butter and milk combo. I'd like to give you the recipe but the simple fact is, I didn't measure. I'm going to have to start measuring if I want to share recipes aren't I? So go ahead and use your favourite frosting recipe. If I have enough butter in the house I love to make this butter cream frosting


  • 2/3 cup of butter (room temperature)

  • 4 cups of powdered sugar

  • 1 tsp vanilla

  • 2 Tablespoons milk


  1. Beat butter until creamy and light in colour

  2. Add powered sugar about 1/2 cup at a time and beat well

  3. Add vanilla, milk and your chosen colour and beat well. This should make about 2 1/2 cups of frosting.

And here's that picture again, just so you don't have to scroll all the way to the top to have another look.


Enjoy!


Now I know this post has been hideously long. Perhaps it would be a good idea in future to stick to one topic per post. But I did promise. And a promise is a promise. I'll be back with more soon.


Love Kylie